”home””about””blog””shop”

Wednesday, February 29, 2012

HAPPY LEAP DAY!

I love Leap Day.  I'm not entirely sure why, it's just a day I've always found fascinating. It gives us an entire extra day to do whatever we want.  The possibilities are endless!  One of my friends even had her son on Leap Day and I just learned that children born on Feb 29th should be known as "leapling" or "leaper" - I doubt it if his high school friends use that as a nick name.  Today, he's either 16 or 4 - I think when he makes his way to the DMV he'll make a strong case for 16 J

Leap Years were first introduced over 2000 years ago with the transition from the Roman Calendar to the Julian Calendar in 45 BCE and has been associated with age-old Leap Day traditions and folklore ever since.

One of the most famous traditions being the woman's  "privilege" of proposing marriage to men instead of the other way around.  This one goes back almost four centuries and apparently any man who refused such a proposal owed his spurned suitor a silk gown and a kiss — provided she was wearing a red petticoat at the moment she popped the question.  Where to these things come from?!?  Love it!

Fast forward 400 years to last Thursday's 30 Rock and now you can celebrate Leap Day with some new folklore.  Happy Leap Day, Leap Day William! 

Tuesday, February 28, 2012

TOOLS OF THE TRADE - WILL THEY EVER MAKE A DIFFERENCE?

I was attempting to make a 4 strand necklace last night and was hitting the proverbial brick wall each time I tried to attach each strand to the clasp.  I was using all my tools but it just wasn't working as I wanted.  I finally gave up after 2+ hours in frustration.  It got me thinking about all the crafty tools that I have in my possession.  I've procured them either by purchasing them or received them as a gifts within the last 3 months. Not to mention the 3 clear plastic bins that now hold all that crafty goodness (this was done to appease Mr. Squareview's insatiable need to organizeJ

All to support my 2012 mission of getting my creative fix one handmade adventure at a time!  Even with the continued disaster that is my jewelry making, I hate to think that this was all for nought! Maybe there is a class I can take.  Off to the interwebs to search!

Monday, February 27, 2012

GIRL SCOUT COOKIES - A WONDERFUL TRADITION

I'm sure like many of you I got the great news recently that my Girl Scout Cookie order is ready!  It is a truly wonderful time of the year where I throw my diet out the window and savor the those delicious cookies.  My In-Laws live in Savannah, GA so I had the opportunity to learn about the origins of the Girl Scouts during one of our trips when we visited the Juliette "Daisy" Gordon Low House (the founder of the Girl Scouts).  It got me wondering how the cookie tradition started (I may have missed that part of the tour! J)

Luckily, the Girl Scout website is chalk full of a ton of information.  I found this brief history of the cookie origins here.  There are a ton of additional details if you are interested.

Girl Scout Cookies® had their earliest beginnings in the kitchens and ovens of our girl members, with mothers volunteering as technical advisers. The sale of cookies as a way to finance troop activities began as early as 1917, five years after Juliette Gordon Low started Girl Scouting in the United States. The earliest mention of a cookie sale found to date was that of the Mistletoe Troop in Muskogee, Oklahoma, which baked cookies and sold them in its high school cafeteria as a service project in December 1917.
In July 1922, The American Girl magazine, published by Girl Scout national head headquarters, featured an article by Florence E. Neil, a local director in Chicago,Illinois. Miss Neil provided a cookie recipe that was given to the council's 2,000 Girl Scouts. She estimated the approximate cost of ingredients for six- to seven-dozen cookies to be 26 to 36 cents. The cookies, she suggested, could be sold by troops for 25 or 30 cents per dozen.
In the 1920s and 1930s, Girl Scouts in different parts of the country continued to bake their own simple sugar cookies with their mothers. These cookies were packaged in wax paper bags, sealed with a sticker, and sold door to door for 25 to 35 cents per dozen.

An Early Girl Scout Cookie® Recipe
1 cup butter
1 cup sugar plus additional amount for topping (optional)
2 eggs
2 tablespoons milk
1 teaspoon vanilla
2 cups flour
1 teaspoon salt
2 teaspoons baking powder


Cream butter and the cup of sugar; add well-beaten eggs, then milk, vanilla, flour, salt, and baking powder. Refrigerate for at least 1 hour. Roll dough, cut into trefoil shapes, and sprinkle sugar on top, if desired. Bake in a quick oven (375°) for approximately 8 to 10 minutes or until the edges begin to brown. Makes six- to seven-dozen cookies

Now, don't get me wrong, those sound great but I'm definitely glad the recipes have expanded in the past several decades.  I'm most grateful for the Samoas and the Tagalongs,  two of my favorites -


However it looks like they may have some competition with these recent additions...Yum!

What is your favorite?

Friday, February 24, 2012

HOLIDAY DECORATING FOR SPRING part 2

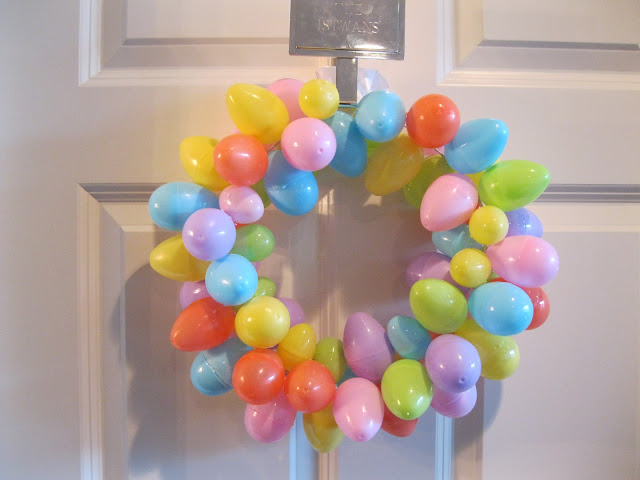
Here it is - My Easter egg wreath project from start to finish!
I started with some store bought Easter eggs
 and a wire coat hanger bent into a circle
my tools for the job - electric drill, flat nose & round nose pliers, wire cutters and 22 gauge wire
 Mr. Squareview drilled two holes in each egg, alternating
between drilling them on the narrow end and the fatter end of the eggs.
Alternating is needed to make sure that your eggs lay well as you put them around the hanger.
 I bent the wire by hand to make a U shape and then shaped it using the
 round nose pliers then placed the wire through the holes
 and used the flat nose pliers to twist and secure the end of the wire
to make a loop
 to string through the hanger
one down, about 119 to go....
I filled out the hanger using the small and medium eggs. 
The large ones in the bag just didn't play sit well with the others
 and voila.  c'est complete! and ready to welcome both our guests and spring.
Hope you enjoyed the project and it put you in the mood for springtime.

Wednesday, February 22, 2012

HOLIDAY DECORATING FOR SPRING part 1

photo curtosy of Pottery Barn
Last fall, I found this lovely engrave-able door wreath hanger at Pottery Barn.  I was newly married and wanted to celebrate my holiday decorating as a couple.  What better way to do so than to engrave our family name on our wreath hanger to present to guests as they come to our door during the season.  That said, I was reluctant to get a live wreath as they don't last that long so I figured I could make one instead.  I put my crafty tools together and glue gunned each and every little individual Christmas ball together until I had myself a gorgeous little wreath.  It was only after the glue dried on my creation that I found a much simpler solution on Eddie Ross's beautiful website here.  

What's a girl to do?  I really loved my little wreath and I only have one front door so I kept Eddie Ross's idea in my back pocket for future use. 

Low and behold, the opportunity arose for me to finally use one of my dry cleaner's wire hangers and the opportunity came in the form of a few bags of plastic pastel Easter eggs I ran across in Michael's!   I grabbed 4 bags that contained large, medium, and small Easter eggs totalling about 120 and headed home with a plan of action to create an Easter egg wreath using Eddie Ross's technique.  Now, the obstacle to this plan might have occurred to you already but it took a little more time to dawn on me...  That obstacle was that there is a major difference between the Christmas ornaments used in the example and the Easter eggs I bought to use.  That difference is that there are no hooks or holes in which to place some sort of hook or hanging device on which to loop on to the wire coat hanger to create the wreath.  Phrump... What now???

Mr. Squareview's electric drill to the rescue!  After a few fits and starts and about 3 hours of work, I have a new wreath with which to greet my guests!  Stay tuned for tutorial and pictures!

Tuesday, February 21, 2012

MULLET BAR - CHANGING AN ARMOIRE TO A BAR - THE FINISHED PROJECT

You may remember from a previous post that Mr. Squareview and I chose to make our armoire into a bar after watching an episode of the Nate Berkus Show (see Bryan Batt's version of the Mullet bar here).
Before the makeover: Years ago we used it as a TV cabinet. Then a place to store our wine and liquor collection.  However, It just wasn't reaching its full potential.  Something just had to be done and fast!  Out came the paint and here is how it went.  Enjoy!

We used about 1 1/2 jars of Martha Stewart Living Metallic Paint in Polished Silver.  It went on well and coated enough for coverage but still allowed the wood grain show through. You can see the difference below in the picture on the right.  The walls have one coat, the bottom is still the original wood.

 we painted every surface inside, top, bottom & sides with 2 coats 
we added a mirror to the back wall and marble tiles to catch any drips.
We added a puck light to the ceiling to lighten it up and we (finally!) found a use for our wedding cake stand... I knew it would come in handy one day J

 the former spot for the dvd player holds the wine fridge perfectly snug.
top it off with Mr. Squareview's beertender and.... 
Voila! The Mullett Bar is complete and ready for a party!  Especially since we filled the bottom right hand cubby with our other wine and liquor bottles!  Mr. Squareview is deciding if he should build some sort of wine rack for that space or not.  It would be perfect for an X shape.  We'll see how it goes. 

 It was such a fun project and relatively easy to complete.  You could even use a cool metallic wallpaper instead of painting to add more dimension. If you have an armoire that needs a little love, the mullet bar is calling your name.   I'd love to hear about your experience if you take on this project!

Monday, February 20, 2012

HAPPY (OBSERVED) BIRTHDAY, MR. PRESIDENT!

Mr. Squareview and I took our day off and finished our Mullet Bar.  I'll share pics tomorrow.  In the meantime, I wanted to take a moment to post a quick birthday greeting to our first President.
 
Born February 22 [February 11, Old Style calendar], 1732, Westmoreland County, Virginia [U.S.]—died December 14, 1799, Mount Vernon, Virginia, U.S.) American general and commander in chief of the colonial armies in the American Revolution (1775–83) and subsequently first president of the United States (1789–97).

"I hold the maxim no less applicable to public than to private affairs, that honesty is the best policy."
George Washington


Saturday, February 18, 2012

VALENTINE'S DAY REDO = LETTERPRESS TAKE 2

from dkldesigns on etsy
Mr. Squareview wears a lot of cufflinks and as a result, he seems to receive cufflinks as gifts pretty regularly.  Instead of chalking this up to my lack of imagination, I chose to declare it tradition! Last year, I got him ones that had mini maps of Chicago and those went over really well.  Again, in no way due to lack of imagination (at all, really, I swear!) I went right back to dlkdesigns on etsy ran across cuff links with mini maps, but instead of only choosing one location, these let you to choose two!  See, TOTALLY different than last year, right? J I picked Washington, DC and St. Lucia this time around.  Mr. Squareview proposed in DC and we honeymooned in St. Lucia.  I thought it would be a romantic way to bookmark our wedding memories.   Now to ensure that I would not be accused of a repeat offenders lack of uniqueness, I figured I'd spice up the packaging   Why not whip out the QuickKutz L Letterpress out for another try.  This time I was even prepared enough to remember to take pictures! I meticulously documented each and every step to make up for forgetting to do it the first time. As you will see, I had a bit more luck this time with the clean up, but ran into the same issue with the ink getting on the plastic surround of the plate.   It was a bit frustrating.  Enjoy the photos!
you can see the ink attaching to the plastic surround.  I used the baby wipes to remove best I could
As suggested on the Boxcar Press review.  Definitely use if creating a multi color print
taping down the press. another tip from Boxcar Press
the best run, but still not perfect
second run.  even with removing the ink with baby wipes, still got the bleed.
closest one was the first run, second had the more bleed from the ink on the plastic surround
clean up tools.  goo gone candle wax lifter worked like a dream!
rolled it on...
wiped it off...
trimmed and rounded the edges
Mr. Squareview's cufflinks
and voila!