”home””about””blog””shop”

Friday, June 29, 2012

I HEART NICOLE'S CLASSES


Happy Friday Everyone!

Today I wanted to share one of my newest addictions - Nicole's Classes free tutorials { found here }.  These concise and informative tutorials focus on Photoshop, Illustrator (my personal fav), InDesign, and general typography design.  As I'm still in the process of browbeating convincing Mr. Squareview into pulling the trigger and purchasing the Adobe Creative Suite, I can only watch these longingly.  I cannot wait to sign up for the 4 week classes they offer after Mr. Squareview finally caves! 

Enjoy this example of how to create a bracket in Illustrator.  Have a great weekend!

Tuesday, June 26, 2012

MODERN NURSERY ART - ANOTHER WHALE OF A TIME


You may remember from a previous post { found here } that I was playing around with using hand drawn animals in Adobe Illustrator. This all began because I wasn't having any luck finding a modern nursery art piece to give as a gift for some family friends that became new Grandparents so I decided to make my own. 

I ended up using a fabric design in print form for that gift but it made me realize that it would also look super cute with fabric as well.

Well, I had another opportunity to test out this theory as my colleague's beautiful baby boy was turning one and moving into an new house.  I jumped at the chance to make him something for his new space to make him feel at home & wanted to share the results with you.

I took the whale that I drew for the piece above and literally cut it to use as my template.  Walter's room is going to be navy blue with splashes of orange so I used that as my color palette and got to work designing.    

I ORIGINALLY TRIED TO INCLUDE THE BLOW HOLE SPRAY, BUT IT JUST  DIDN'T WORK
INSTEAD, I CHOOSE TO USE SOME CUTE BUBBLES
MOVING CLOCKWISE: 1. MY TOOLS 2. POSITIONING MY TEMPLATE FOR TRACING
3. TRACING MY WHALE 4. MY ORIGINAL FABRIC OPTIONS

FIRST DRAFT - I THOUGHT THE ORANGE WOULD POP, BUT THE FLOWER PATTERN JUST WASN'T DOING IT FOR ME.  ALSO, LOOK AT THAT SAD ONE ARMED TEDDY I USED AS A PROP!  POOR GUY!
QUICK TRIP TO THE FABRIC STORE AND VOILA! SWEET AND SIMPLE BLUE CIRCLES FIT THE BILL { even though it was unintentional, they matched my bubbles perfectly - sweet serendipity! }

I was super pleased at how it turned out and just gave it to Walter's Mom. Yea! She liked it too.  I'd love to hear what you think of the final project.

Monday, June 25, 2012

MUSIC MONDAY vol 10

Oldie but goodie to share today.  I may be a bigger fan than most of this entire album  { as I'm a sentimental sap }, but all  in all, it is just plain fun.   This song in particular always puts me in an upbeat mood and gets me dancing in my seat, despite the fact that the actual lyrics are about breaking up! Enjoy! 

Friday, June 22, 2012

HAPPY FRIDAY & A FUN NEW PROJECT!

Happy Friday everyone!  Even though I just got back from vacation, I'm really looking forward to the weekend.  It is supposed to be 84 and sunny here in Chicago and I can't wait to take advantage of the beautiful weather!


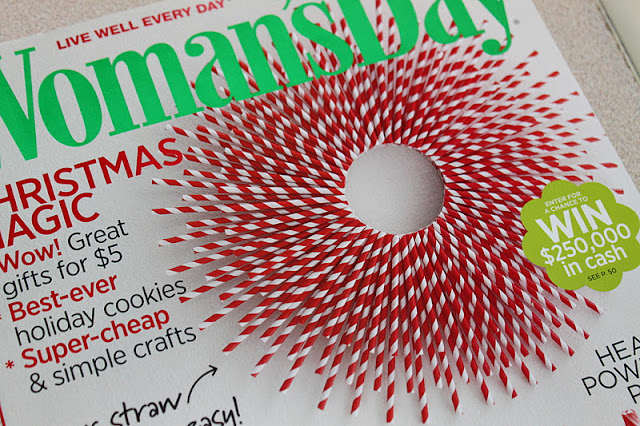
While I was away, a package I've been expecting arrived.  It contained the last items needed in my list of supplies for a project I've been itching to do.  As the weather is meant to be so incredible this weekend, I may not find the time to begin it but I wanted to give you a taste.... Stay tuned for the my take on the DIY Paper Straw Wreath!


Thursday, June 21, 2012

AHHHH...BACK FROM A MUCH NEEDED VACATION!


Mr.Squareview and I just arrived home from Key West, FL where we celebrated our 1st Anniversary.  It was a fantastic trip.  We really were able to get some much needed rest and relaxation.   We consumed Conch Fritters and Key Lime Pie (and a few cocktails) as often as we could!  I can't wait to go back!


We were having such a great time, we really didn't want to go home.  Mother Nature helped change our mind though and you'll see why in this pic I took as we were headed to the airport J Even with the downpour - I'm dreaming of my next opportunity to get back to, as the locals call it, Key Weird!

Monday, June 18, 2012

ONE DOWN, 50 TO GO


I can't believe it, but one year ago today I married my best friend.  It was a gorgeous sunny day and I would do it all over again in a heart beat.  Happy Anniversary, Mr. Squareview! Time sure does fly when you are having fun.  Here is too another 50 anniversaries.  Love you!


Wednesday, June 13, 2012

A LITTLE MUCH NEEDED R&R

Mr. Squareview and I are leaving this weekend for a little mini-break.  We're headed to the Florida Keys for some much needed rest & relaxation!  I'm so looking forward to our trip as it will not only be a sun filled beach trip, but a trip to celebrate our one year anniversary.  Cannot wait!

You may have noticed from my other posts that I'm on the road a bit for my day job.  In fact, both Mr. Squareview and I travel for work.  As a result, we've got packing pretty much down to a science.  Unless our travels take us away for more than 10 days, we do not check bags if we can help it.  You may think this is an economical choice, but it is not (we both travel enough that we don't have to pay for check bags).  It is more of a self inflicted challenge.  We just love to see how much we can cram into our carry-on rolly bags. We even use a little 18" one that, in a pinch, can be stored underneath the seats in front of us.

As this trip is special,  we'll be packing a bit more date night outfits than usual so we'll likely graduate to the "huge" 24" bag.  Oh, the space I will have!!  Looking forward to all this space, I began to plan my outfits using Polyvore for inspiration.  Here are a few of the combos I came up with.  What do you think?


A day at the beach


Sightseeing in the afternoon


For a night on the town


Anyone who knows me would argue that my date night outfit is not my style at all.  But, I saw the dress and thought - if there ever was a place to wear it - Key West was it!  I wonder if Jimmy Buffet will like it....?


Tuesday, June 12, 2012

INSPIRATION TO STAY CREATIVE

I ran across this gorgeous post on Reverie {you can find it here} and pinned it on Pinterest right away.  It is remarkably similar to a previous post of mine from April {for a reminder, you can see it here}, but wanted to share it again as I find I need to be reminded of these things over and over again.  Plus, this version is super pretty and the typography is lovely!


I've hit a bit of a wall in a couple projects I've been working on { more on that soon } so I decided to go on a bit of a motivational goodie hunt on Pinterest to find other things with a similar message... I think some may actually make it out of the virtual world and make it on to my actual pinboard!


Source: xaxor.com via Crystal on Pinterest


Monday, June 11, 2012

Friday, June 8, 2012

PATRIOTIC WREATH PROJECT Part 2


Happy Friday to all!  As promised, here are the pics from my DIY pinwheel door wreath.  I'm not sure if the settings on my camera are a bit off, but some of the pictures ended up being a bit fuzzy (especially the final product).  When I have the official door hanging ceremony, I'll take some more snaps and update the post (no, I'm not seriously going to have an actual ceremony! J).  {new pictures added - yea!}

I started off with just a handful of supplies for this project:

WHAT YOU'LL NEED ::
1. Some combination of Red, White, & Blue paper
2. 12inch wreath or flower form
3. Scissors
4. Hole punch
5. Brads.  Mine were these cute silver stars!
NOT PICTURED:
6. Craft Glue
7. 5 inch Styrofoam wreath form  
8. A red streamer roll

Now you're off to the races!   

Using the same measurements as the Resa Likes Colors post that inspired my project, I began cutting the paper into 3 3/4 x 3 3/4 inch squares.  Once I had about 20 squares, I cut a 2 inch diagonal cut on each of the four corners towards the center.  Finally, I used the hole punch to create 5 total holes.  One on each of the four corners (make sure to only punch one per "flap") and one in the center of the square.

Next, flip the paper so the pattern you want to show on the pinwheels is faced down. Take each of the four corners and align the corner holes to the center hole placing one corner on top of the other.  (Editor's note: my big hands kind of get in the way here, you can see it better on Resa's post as she is using glue instead).

Place a brad through all 5 holes aligned in the center and fasten.

Lather, rinse, & repeat until you have enough pinwheels to circle the entire wreath with extras to overlap for coverage.

Next, position each of the pinwheels around the wreath form.  I placed the blue pinwheels directly on the form and then elevated the red pinwheels by placing them on pieces of Styrofoam I cut to size from the other wreath form to fit between the blue pinwheels. This provided the coverage and spacing I needed while still allowing each of the pinwheels to be seen.


It didn't allow for enough coverage though, as you can still see the wood from the form peeking through some of the pinwheels.  That is where the red streamer came in (I ended having to purchase a standard 250 feet roll and only used less than 10 feet of it - but it was worth the $1.97!).  I hand wrapped the steamer in one continuous loop around the wreath form for coverage, put the pinwheels back on and arranged them until I was satisfied. After some tweaking, I busted out the craft glue and went to town.  With drying time, this project took me less than 2 hours and I'm pleased with the results and ready for the 4th!   Happy weekend all!

{TA DA - NEW PHOTOS ADDED!}  Red streamer wrap, close up of the project & the final results: 

Thursday, June 7, 2012

PATRIOTIC WREATH PROJECT Part 1

Mr. Squarview and I bought a personalized wreath hanger {as you may remember from this post} and I've been trying to decorate it seasonally {as you may remember from this post}

I've been wreath-less since I took down the Easter eggs and have been searching for a summer themed replacement idea ever since.  I stumbled upon this post from Resa Likes Colors on how to make patriotic pinwheels.  It looked remarkably straight forward, so I decided to give it a try.


I completed the project yesterday and I love how the pinwheels tuned out.  Here is a preview pic of my supplies.  Stay tuned for a step by step post with all the details.

While I'm happy with the results, I'm not entirely sure if it is something I'd like to leave up for the entire summer. I think by July 5th, it may look a bit tired. So I decided to go on the hunt for something that will last through the rest of the summer.

I've been a bit obsessed with paper straws lately and haven't really had the opportunity to use them yet.  That said, I've been lazer focused on how to use them for a party, not a project.  Another eureka moment and a quick Google search and voila!  A paper straw wreath. Darn, and I thought I was so unique.  Looks like I've got another project on deck!  Mr. Squareview is going to think I'm nuts J


Tuesday, June 5, 2012

WHAT TO DO WITH A SMALL OUTDOOR SPACE? Part 2

The beautiful day we're having today in Chicago reminded me that I forgot to post part 2 of a post.  You may remember from a previous post {found here} that I posed the question - What do you do with a small outdoor space?  Specifically, I was trying to figure out how you can you enjoy a gorgeous outdoor umbrella on a balcony that is only 5' x 9'?

You may also remember that a recent trip to New Orleans provided Mr. Squareview and I with an idea to answer that question.


Here is that idea in practice (Sorry, I forgot to take any before pictures).

WHAT YOU'LL NEED ::
1. A 24 inch high PVC tube with a diameter slightly wider than the post of the umbrella
2. Metal or study plastic zip ties

HOW TO ::
1. Using the zip ties, attach the PVC tube to a secure section of the deck, preferably a corner like the two images below.
2. Place umbrella in the tube like the 3rd image.
3. Secure the post of the umbrella to the balcony with another zip tie.

Voila! Your done.  Seriously, that's it.  If you were uber creative, you would likely spray paint the PVC tube to match the balcony.  I didn't do so because 1.  I thought of it only after I had already secured it to the deck and 2.   My furniture covered it enough that it is not too much of an eyesore.
Here are my final results.  All you need to enjoy this space fully is some sort of yummy frozen cocktail.  Summer is officially open!  I would love to hear about or see any pictures of your outdoor spaces.


Monday, June 4, 2012

MUSIC MONDAY vol 8

Now, when I first heard the opening bars of this song, I was taken back to my middle school days as it had hints of Billy Idol's Eyes Without a Face.  I think that is why I immediately liked it - don't you think everybody needs a little Billy love in their life? I certainly do!

As I listened to it a few more times, I concluded that the Billy resemblance was a bit of a reach on my end I enjoyed it on its own merit.  I present to you Myth by Beach House.  Enjoy.


Friday, June 1, 2012

I HEART POLYVORE


I was in a shopping mood this afternoon and found myself considering playing hooky to pop over to the shops.  I was a good girl and didn't, but my mind continued to wander against my will. To satisfy my need for pretty outfits, I did what any girl would - took a mental break and headed over to Polyvore.com to get my fix.

Have you spent any time on this site?  I'm completely smitten.  It allows you to browse endless selections of clothes and combine your favorites into gorgeous ensembles - complete with accessories.  No longer is there a need to leave the comfort of you office, sofa, etc. for a little window shopping - now you can browser shop. Ha! The wonderful part of it all is that it also gives you the designer and cost of each and every item you choose. A ready made shopping list for your next outing.  Here are a few that I put together for weddings, weekends away, work, and date night.


Weddings ::
wedding, created by squareviewstudios on Polyvore

evening, created by squareviewstudios on Polyvore
Weekends Away ::
island outting, created by squareviewstudios on Polyvore
weekend getaway, created by squareviewstudios on Polyvore
Work ::
summer friday office, created by squareviewstudios on Polyvore

 work 1, created by squareviewstudios on Polyvore
Date Night ::

summer night out, created by squareviewstudios on Polyvore
date night 1, created by squareviewstudios on Polyvore

Speaking of date night, I'm off.  Wish I had that super cute dress to wear!  Happy weekend everyone!